Ready to Design a WordPress website and take it to the next level? Once you choose your domain name, set up your web host, and install WordPress, then it’s time to ditch those pesky plugins and enjoy a whole host of benefits that come with designing website on WordPress without plugins and without the need to use any additional website builder! From improved website performance to greater control and customization, you’ll be amazed at how much more you can achieve when you take control of your WordPress site.
In this article, we’re diving headfirst into the amazing world of the Gutenberg editor! If you’re not already familiar with it, Gutenberg is the new default plugin for WordPress and it’s packed with tons of cool features that will allow you to make a website and design its web pages like a breeze.
We’ll take a closer look at the main differences between the WordPress Gutenberg editor and the classic editor, so you can see just how much easier it is to create stunning pages and build your website with Gutenberg. Plus, we’ll show you how to work with WordPress Gutenberg blocks, which are the building components of any good web page. By the time we’re done, you’ll have all the skills you need to create beautiful, functional web pages that will wow your visitors.
But that’s not all! This is a guide on how to make it through the process of designing website on WordPress and creating a page using only the WordPress editor. Whether you’re a newbie to WordPress who wants to learn how to build a website or a seasoned pro who is looking to make an ecommerce website or business website, this article has something for everyone.
Let’s design, maintain, and perfect your dream website!
Table of Contents
Design a WordPress Website with the TT3 Theme

The latest default WordPress theme, Twenty Twenty-Three, is more than just a plain empty box. This theme allows users to take advantage of the latest WordPress site editing features and make the most out of their website.
Inside Twenty Twenty-Three theme, the old WordPress customizer is no more, instead, you will find a variety of templates and template parts that you can customize to fit your website’s needs. Plus, with ten distinct style variations to choose from, you can create a truly unique website with just a single click.
This theme fully supports all the new features available in WordPress 6.1, such as Fluid Typography and Improved Template System. And while the theme only regulates the appearance of the site, leaving functionality to the plugins, it does a fantastic job of offering all the latest Gutenberg site editing features.
With WordPress Twenty Twenty-Three, customizing the look of your website has never been easier. You don’t need to be a coding genius to design a WordPress website that’s a beautiful, functional, and engaging website with WordPress, especially with the free WordPress website builder that comes with the Twenty Twenty-Three theme.
Can you build a WordPress site without a theme?
Technically speaking, you can build a WordPress site without a theme. However, doing so would leave you with a website that looks like a blank canvas, with no design or layout whatsoever. Without a theme, your website would have no colors, fonts, or styles applied, making it appear bland and unprofessional.
Additionally, building a WordPress site without a theme would require extensive knowledge of web development, including HTML, CSS, and PHP. You would need to create and style every element of your site from scratch, including the header, footer, navigation, and content areas. This would be a time-consuming and complex process, especially if you’re not familiar with web development.
Moreover, WordPress themes offer much more than just aesthetics. Themes come with built-in functionality, such as responsive design, SEO optimization, and support for plugins. By using a theme, you can ensure that your site is optimized for both users and search engines, saving you time and effort in the long run.
In conclusion, while it’s technically possible to build a WordPress site without a theme, it’s not recommended for most users. Themes provide the necessary design and functionality for a professional-looking and optimized website, and they can save you time and effort in the development process. Instead of trying to build a site without a theme, consider choosing a theme that meets your design and functionality needs and customizing it to fit your brand.
What is Block Editor in WordPress?
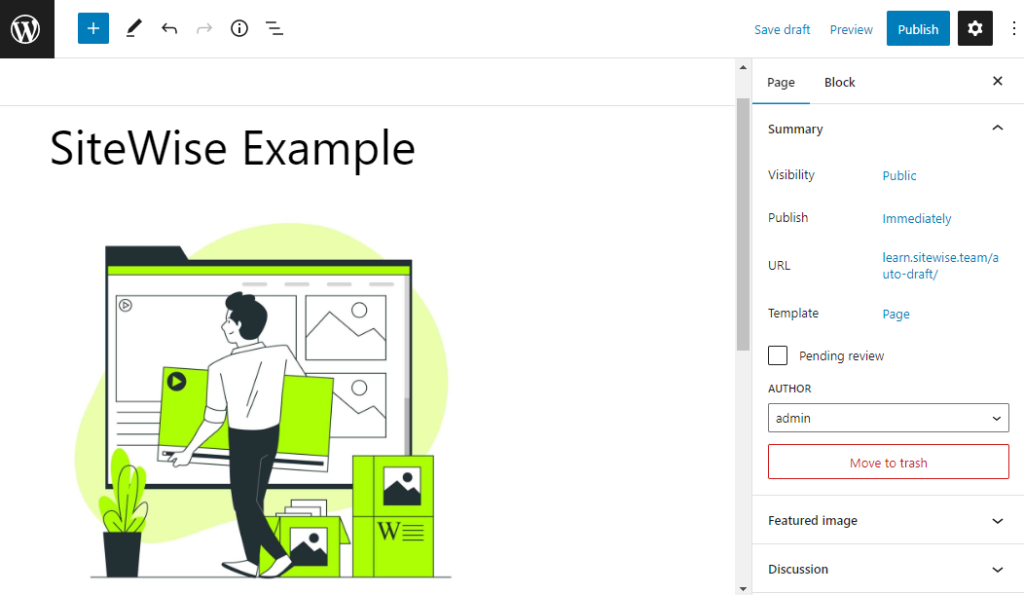
Whether you’re looking to make a business website, a portfolio website, etc. If you haven’t heard of the WordPress Gutenberg editor, a.k.a Gutenberg, WordPress editor, or simply the block editor yet, you’re missing out on one of the biggest game-changers to hit the platform since it first launched back in 2003.
With Gutenberg, building pages have never been easier! It’s the new default page builder integrated into WordPress that uses the concept of “blocks”. These WordPress Gutenberg blocks are like little building blocks that you can drag and drop onto your page, to create a fully functional web page. We’re talking headings, subheadings, lists, videos, widgets, and so much more!
This WordPress Editor first hit the scene as part of the WordPress 5.0 release in December 2018, and it’s been steadily gaining popularity ever since.
But don’t worry if you’re new to the Gutenberg game. We’ve got you covered with a step-by-step guide to creating a web page that will have your site looking sleek and professional in no time. We’ll walk you through everything from page creation to adding content blocks, images, and links, so you can take full advantage of this powerful tool. Start building a website and revolutionize your WordPress game with Gutenberg!
WordPress Classic Editor vs Block Editor 2023
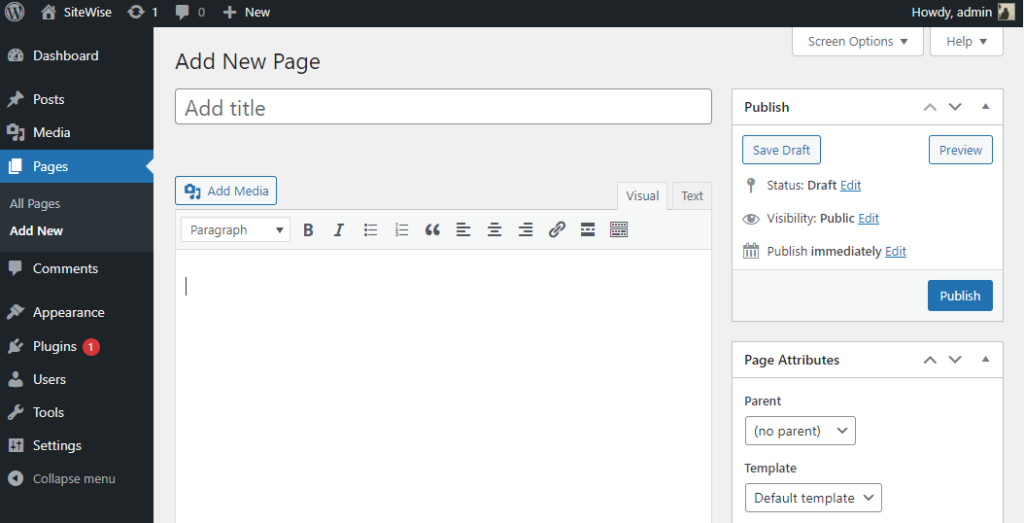
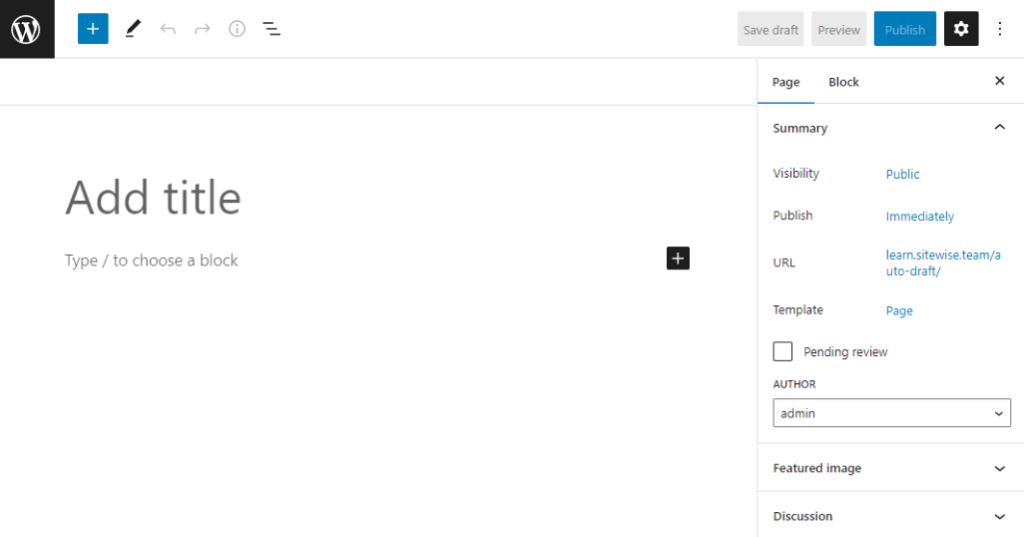
WordPress has two default editors – Gutenberg and Classic. While they have many differences, they do share some similarities. But let’s focus on Gutenberg,
Gutenberg has a user-friendly drag & drop interface that makes editing easy. Plus, it offers scrolling with a parallax effect that adds a touch of pizzazz to your posts. Say goodbye to plain, boring content! With Gutenberg, you can use predefined blocks to create complex elements, like custom blocks that require minimal HTML knowledge.
And the best part? You can download media files directly into the editor, so you can add and edit images online with ease. No more uploading to the library first and then transferring to the editor. Plus, editing items within the editor is a snap, no more hopping back and forth to the library.
But don’t just take our word for it, check out this handy comparison table we made for you:
The WordPress Gutenberg Editor:
- User-friendly drag & drop interface
- Scrolling with parallax effect
- Predefined blocks
- Inline image editing
- Direct download of media files
- Custom blocks for complex elements
- Easy item editing within the editor
- Better performance for image editing
The WordPress Classic Editor:
- No drag & drop interface
- No parallax effect
- No predefined blocks
- No inline image editing
- Upload media files to the library first
- Limited to plain content creation
- No WYSIWYG editing
- Requires additional plugins for advanced features
In short, WordPress Gutenberg Editor offers a more comprehensive and user-friendly editing experience, with advanced features like contact forms, tables, and video inserting all available without the need for additional plugins.
How to Use WordPress Gutenberg Editor to Build a Website
Now that we’ve dipped our toes into the wonderful world of Gutenberg, let’s dive in headfirst and explore all the exciting possibilities it offers for website design!
First things first, we’ll take a tour of the user-friendly interface and get familiar with its functionalities. Then, we’ll move on to more advanced techniques that will take your web design to the next level and streamline your workflow like never before.
So, get ready to unleash your creativity, and let Gutenberg do the heavy lifting for you!
WordPress Gutenberg Editor Interface
When you open it up, get ready for a full-screen experience that hides the dashboard sidebar. This way, you can focus on what matters most: your content.
The three main parts of the WordPress editor are content, the top toolbar, and the sidebar.
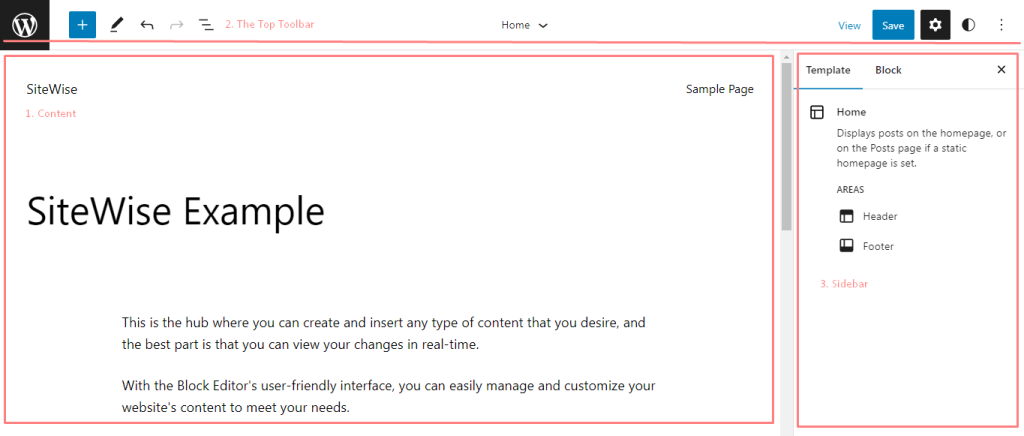
- Speaking of content, that’s the main event in the editor. It takes up most of the screen, and you’ll see a visual preview of what it will look like on the front end of your site. It’s not a replica, but it should give you a pretty good idea of the final design.
- Now, let’s talk about the top toolbar. This nifty feature makes it easy to insert new blocks, undo/redo, and access other vital settings. It’s your go-to for editing your content, so make sure to give it a good once-over.
- And last but not least, we have the sidebar. It’s divided into two tabs: the Post tab and the Block tab. The Post tab lets you configure post-level settings like categories, tags, featured images, and more. Meanwhile, the tab shows the settings for the block that you’ve selected. We’ll dive into this more later, so stay tuned.
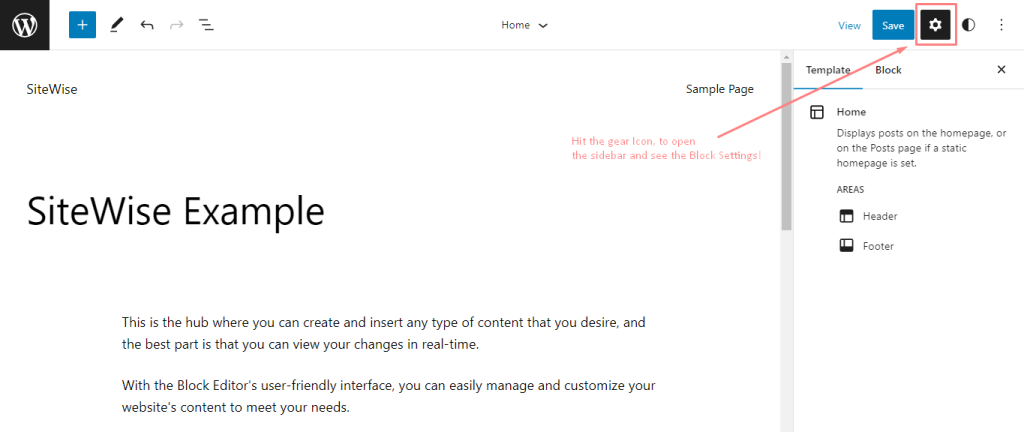
If you want to take your writing experience to the next level, you can hide the sidebar by clicking the “gear” icon in the top-right corner. This will create an even more immersive environment that lets you focus on your content without any distractions. And if you need to bring back the sidebar, all you need to do is click the “gear” icon again. It’s that easy!
Adding Custom WordPress Gutenberg Blocks
let me show you how to add some pizzazz to your posts! If you want to add regular paragraph text, it’s as simple as clicking and typing. Easy peasy, right? But what about other types of content, like images, buttons, or video embeds? That’s where WordPress Gutenberg blocks come in.
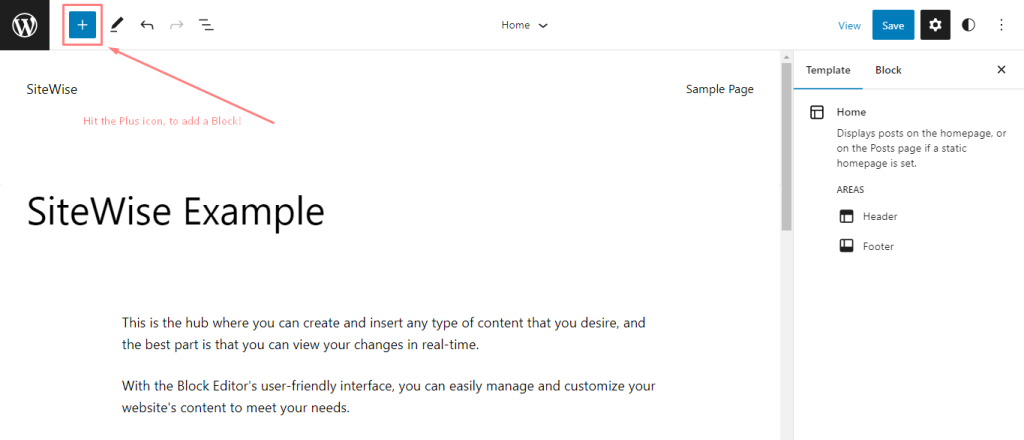
To insert a new block, just click one of the “plus” icons in the interface. You’ll find the main block inserter icon in the top-left corner, but other icons open smaller block inserter interfaces too. Position your mouse cursor where you want to insert the new one, and click the + icon. It’s that simple!
You’ll see a side panel with all the available blocks divided into categories. Browse through the options and hover over a block to see what it does and get a preview. When you find the perfect block, just click on it to insert it into your post.
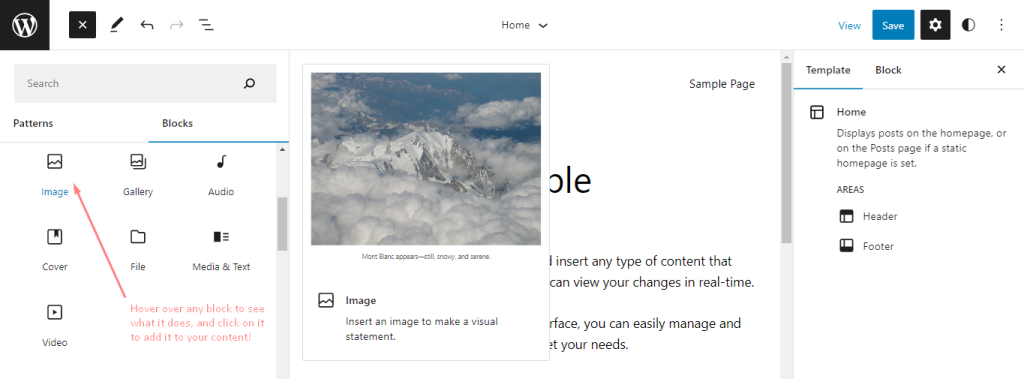
For example, if you want to add a regular image, click the image block, and follow the prompts to upload or choose an existing image from your Media Library. It’s a snap!
Exploring the Essential Formatting Options
To easily format your WordPress Gutenberg blocks, Just click on any block, and a floating toolbar will magically appear! From here, you can make all sorts of basic formatting choices, like adding bold or italics, inserting links, changing alignments, and even adding cool formattings like inline code, strikethrough, and subscript.
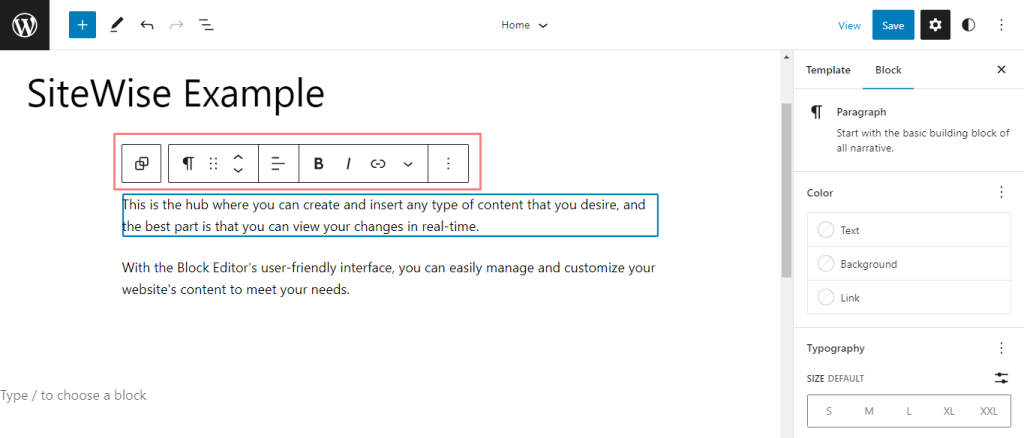
Let me show you an example. Let’s say you want to insert a link into your content. No problemo! Simply select the specific text you want to link, like “For other types of content”, and then click on the link icon on the toolbar. This will open up a bunch of link insertion options that will make it easy-peasy to add a link to your content.
Advanced Block Configuration: Unleashing the Power!
When it comes to creating content with WordPress, the possibilities are endless, thanks to its vast array of blocks. But did you know that each block comes with its own set of additional settings that can help you take your content to the next level?
That’s right! Whether you’re working with a simple paragraph block or a more complex button block, you’ll have access to various options to control the design, layout, functionality, and more. Some blocks offer just a few settings, while others provide a plethora of options to choose from.
To access these settings, all you need to do is select the block you want to customize and head over to the Block tab in the sidebar. From there, you’ll be able to see all the available settings and make changes to suit your needs.
Take the Paragraph block, for example. It’s one of the more versatile blocks out there, allowing you to change the background color, typography, and a whole lot more. And the best part? As you make changes to your block’s settings, you’ll see those changes reflected in real-time, making it easy to fine-tune your content until it’s just right.
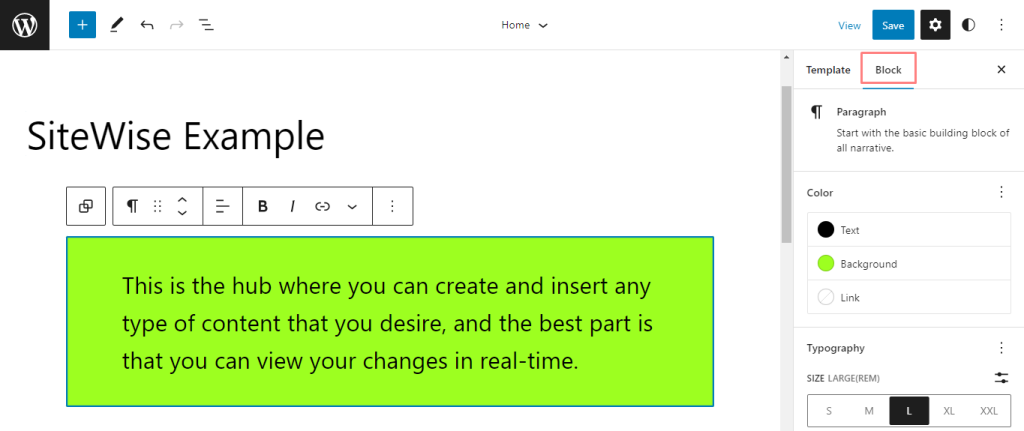
Just remember, each block has its own unique set of settings, so be sure to explore each one to discover its full potential. Even something as simple as a paragraph block can be customized with basic typography and color options, as you can see in the example below.
So when you create a website why settle for a bland and boring one, when you can take full advantage of WordPress’s powerful block settings? With just a few clicks, you can transform your content from ordinary to extraordinary!
Rearranging Blocks: Tips for Effective Organization
If you just need to move a block up or down a couple of positions, simply use the up and down arrows on the floating toolbar. But if you need to make extensive changes to your layout, then drag-and-drop is your new best friend.
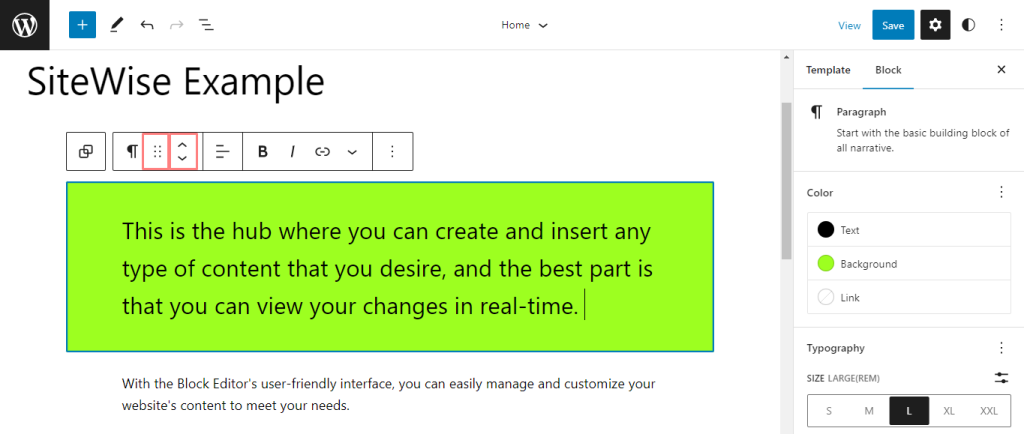
To drag and drop a block, first, click on the “six dots” icon to the left of the arrows. Then, click and hold your mouse on that icon and let your creativity take over as you move the block anywhere you want on the page. With Gutenberg, the possibilities for organizing your content are endless!
Create Engaging Multi-Column Designs
The block editor, which is a more advanced editor than the older TinyMCE editor, lets you create complex layouts with ease. You can now say goodbye to the days of struggling to build a website and make it look the way you want it to.
The block editor has two default blocks, columns, and groups, which make designing layouts a breeze. The columns block lets you create multi-column layouts, and the groups block lets you group multiple blocks. You can use the group block to set a background color for an entire section that displays behind numerous blocks.
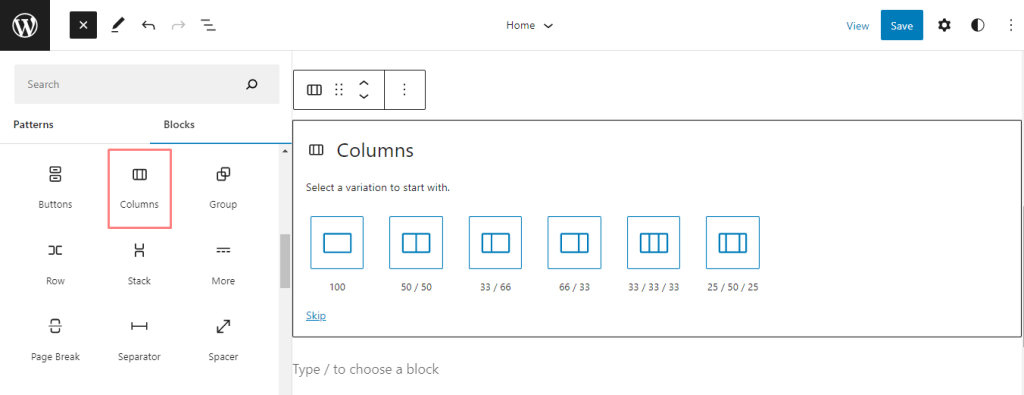
Both blocks work on the principle of “nesting” blocks, which means you put one or more blocks inside of another block. For example, you can create a two-column layout using the columns block, where the left column has some regular paragraph text, and the right column has a button.
To get started, use the block inserter to add the columns block. Then, choose your preferred layout. For this example, we’ll choose a two-column 50/50 layout. Once you’ve chosen your layout, you’ll see two equal-sized boxes with + icons inside. To insert content, click on the + icon to open the block inserter interface.
Once you’ve added the first block to a column, you can hit the + icon to insert additional blocks. Or, you can drag and drop a block from outside the column structure into the column.
Working More Efficiently With the New WordPress
Now that you know the basics of Gutenberg, let’s take your skills to the next level with some nifty tips and tricks that will make you a website builder pro in no time. These valuable insights will help you wield the power of the block editor with ease and efficiency. So buckle up and get ready to rock your content creation game like a boss!
Insert Blocks Using the Forward Slash Key (/)
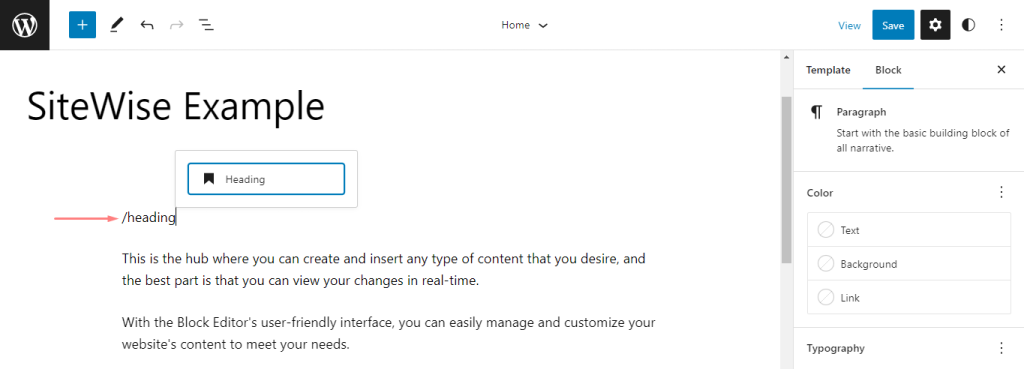
To add a new paragraph block, simply press “Enter” on your keyboard. Alternatively, you can insert a block by typing the forward slash key followed by the name of the desired block. A list of relevant blocks will appear as you type, allowing you to navigate and select your preferred option using your keyboard arrows before pressing “Enter” to confirm your choice.
Let’s say you want to add an image block. With the quick-insert feature, you can simply type “/image” and select the image block from the list that appears. Easy peasy, right? So why not give it a try and see how much time and effort you can save?
Drag and Drop the Image File From Your Desktop
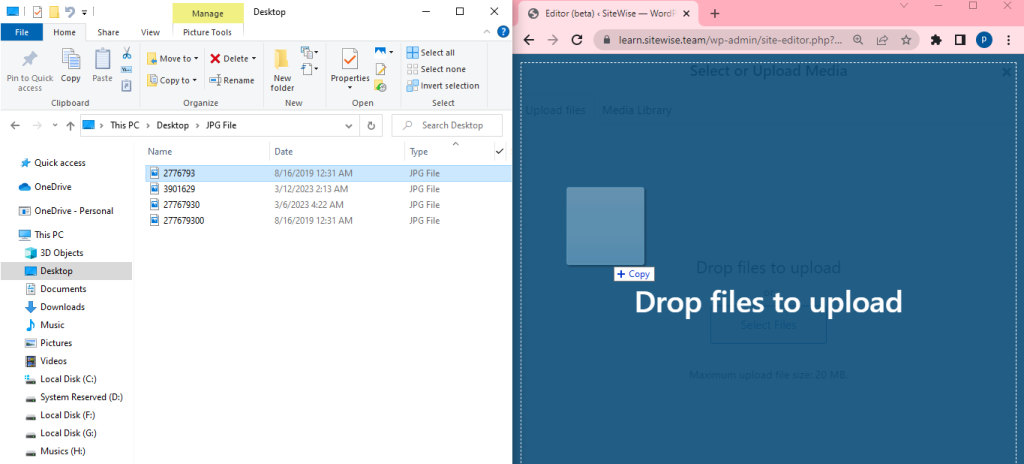
Instead of adding an image block every time you want to upload an image to your WordPress post, Simply drag the image file from your desktop and drop it directly to where you want it in your post. As you drag the image file over your content, you’ll see a blue line marking where the image will be placed.
WordPress will then automatically upload the image and insert an image block at the exact location you dropped it.
Pin the Toolbar to the Top of the Editor for Easy Access
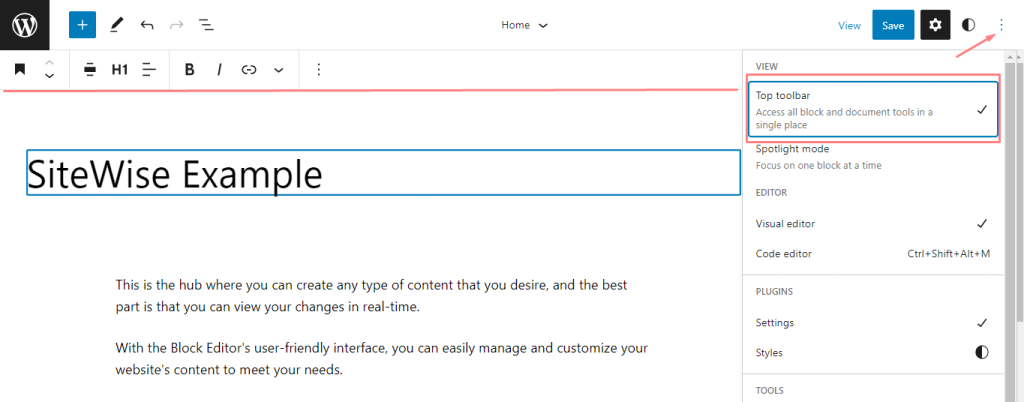
Don’t just constantly scroll up and down to access the formatting toolbar! With the new feature, you can easily pin the toolbar to the top of the editor for easy access.
Copy and Paste Entire Blocks
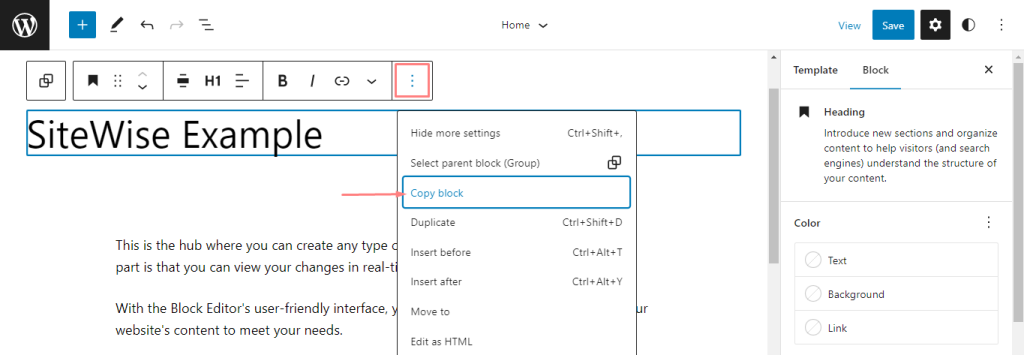
There’s an easy way to copy and paste entire blocks without losing any of their settings.
While copying and pasting text is a no-brainer, it’s a bit different when it comes to blocks. You can’t just use the traditional “Ctrl + C” or right-click method. Instead, follow these simple steps:
- Select the block you want to copy.
- Look for the three dots icon on the block’s toolbar and click it.
- Choose “Copy” from the options that appear.
And voila! You’ve now copied your block with all its settings intact. You can paste it wherever you need it using the regular “Ctrl + V” or right-click method.
Use The List View Option

The List View displays all blocks, including the nested ones, in a neat list format. It’s super easy to select the block you want by just clicking on it in the list. And as a bonus, the editor highlights the selected block when you hover over it in the list.
Just take a look at the example below:
- The primary parent columns block
- Nested blocks for each column
- A nested group block inside one column
- A nested heading block inside the Group block
To select the main parent block, all you need to do is open up the List View and choose it from the list. It’s that simple! Say goodbye to the frustration of selecting the wrong block and hello to a smooth editing experience.
Learning the keyboard shortcuts is a bonus
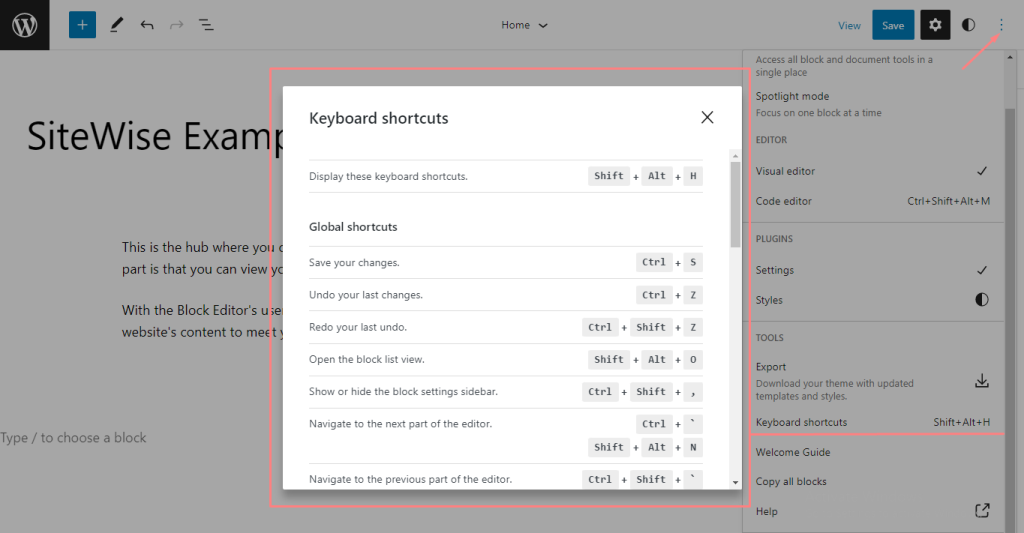
By taking the time to learn these shortcuts, you can perform common actions with ease. Here are some of the most popular shortcuts to get you started:
- Open the block List View — Shift + Alt + O
- Save your changes — Ctrl + S
- Undo your last change(s) — Ctrl + Z
- Redo your last undo — Ctrl + Shift + Z
- Duplicate the selected block(s) — Ctrl + Shift + D
- Delete the selected block(s) — Shift + Alt + Z
- Insert a new block before the selected block(s) — Ctrl + Alt + T
- Insert a new block after the selected block(s) — Ctrl + Alt + Y
And if you ever forget a shortcut, don’t worry! You can easily access a full cheat sheet of all the keyboard shortcuts while in the editor. Just use the keyboard shortcut Shift + Alt + H, or click the “three vertical dots” menu icon (⋮) in the top-right corner of the editor and choose Keyboard shortcuts from the dropdown.
Create Jumping Links With Anchors
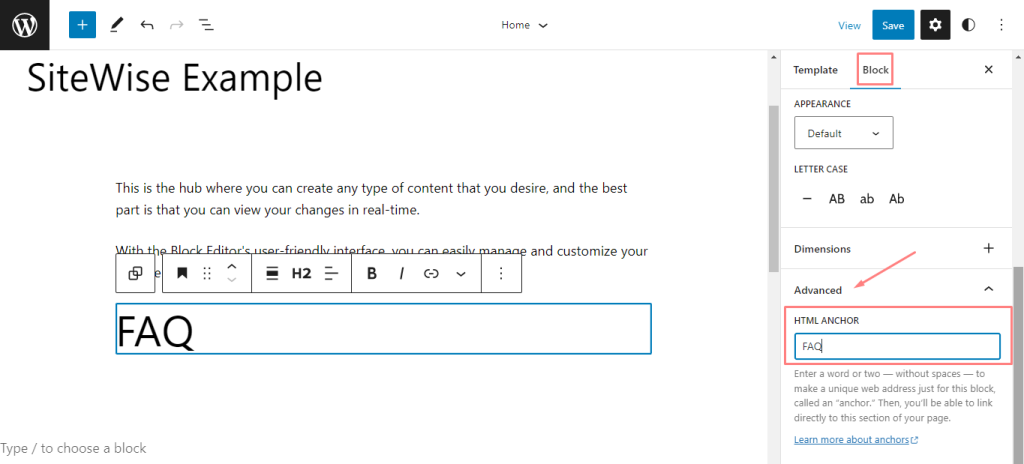
Last but not least, is the HTML anchor links! This nifty tool helps you create jump links to specific sections of your content. No more struggling with manual HTML anchor coding in the classic editor. With Gutenberg, simply type in your jump link text in the HTML anchor field located in the Advanced area of any block’s settings. That’s it!
The More Advanced Concepts of the WordPress Editor
we’ve been on a roll learning about the ins and outs of the editor and some nifty tricks to streamline your workflow. But, now that we’ve got that foundation down pat, it’s time to step up our game and delve into two slightly more advanced tactics:
First up, we have block patterns – a powerful tool that allows you to quickly create custom layouts by grouping together multiple blocks.
And secondly, reusable blocks – a game-changing feature that lets you save frequently used blocks as templates, so you can easily reuse them throughout your site. Let’s get into it!
Block Patterns in WordPress
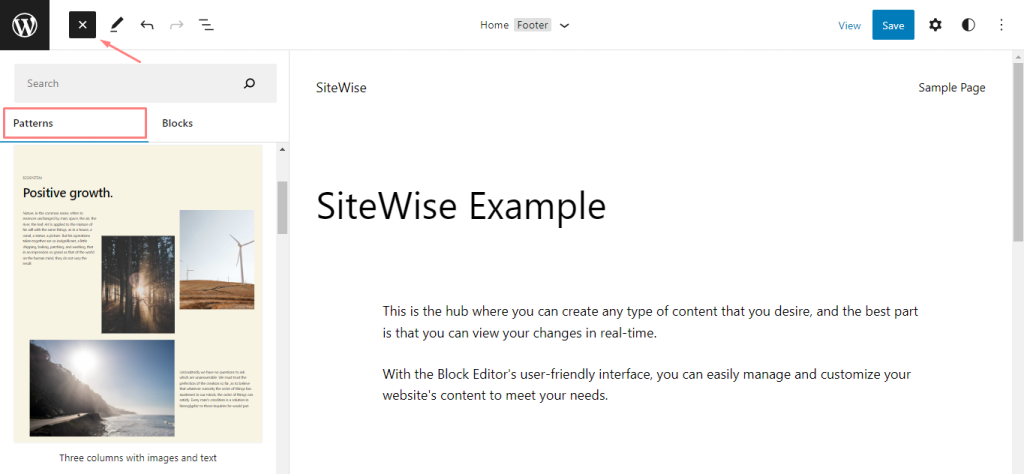
let me introduce you to the exciting world of block patterns in WordPress! A block pattern is like a pre-built template of blocks arranged in a layout. It can be as simple as a group of buttons or a complete section of a webpage.
Fortunately, WordPress has its own collection of built-in block patterns, and third-party developers can also add their own unique patterns. To use these patterns, all you have to do is insert them from the Patterns tab of the main block inserter, and then you can edit them to your heart’s content.
The WordPress core team has launched an official block pattern library on WordPress.org. Simply copy and paste the pattern you want from the library’s website into the editor, and you’re good to go.
Use WordPress Gutenberg Editor’s Reusable Blocks
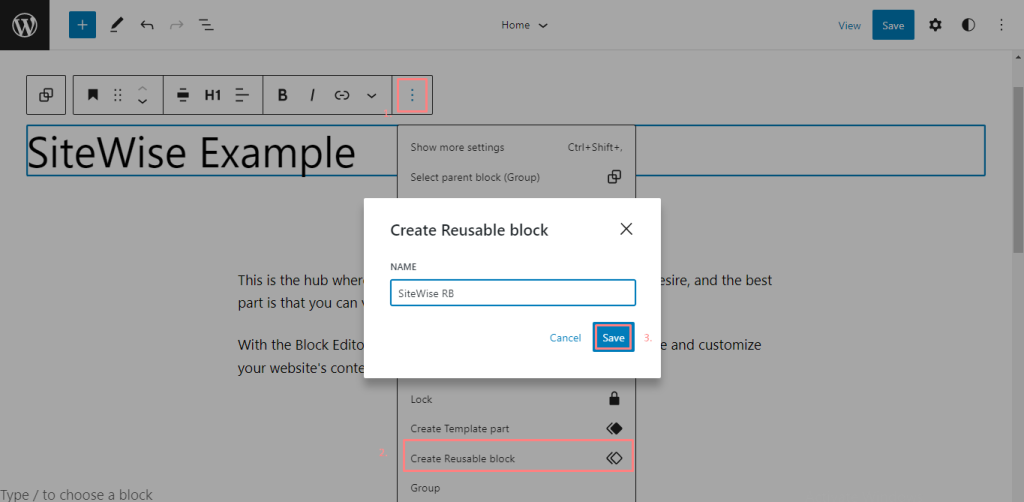
Reusable blocks are a collection of one or more blocks that you can insert as a group. Think of them as a shortcut to save you time and effort when creating content. But what sets reusable blocks apart from block patterns is that any changes made to the reusable block will be reflected across all instances of that block. No need to go through each page or post and update the same block over and over again!
For example, if you have a call to action (CTA) button that you want to use on multiple pages, you can create a reusable block for it. Then, if you ever want to change the text or color of that CTA, you can simply update the reusable block and it will be updated on every page where it’s used. Easy peasy!
To create a reusable block in the Gutenberg WordPress editor, simply select the blocks you want to group and click the “Add to Reusable blocks” option. You can then give your new reusable block a name and it will be added to your collection. You can insert your reusable block by searching for its name or by using the quick-insert feature with the / key.
Whenever you modify a reusable block, you will receive a prompt to publish those changes when you update the corresponding post. If you opt to publish the changes, they will be reflected in all instances of the reusable block throughout your site. This means that not only do reusable blocks streamline your workflow and save you time, but they also ensure that your content remains consistent across your website.
Simple Website Design without WordPress Plugins
If you’ve been following along with our Gutenberg block editor tutorial on How to design a WordPress website without plugins, then you’re already familiar with the basics. But now it’s time to put all that knowledge into action.
Together, we’re going to design a stunning website from top to bottom that will blow your mind. And the best part? We’ll be using the Gutenberg editor, which is now the default editor for WordPress.
Don’t worry if you’re still new to the Gutenberg editor. I’ll be your guide throughout this tutorial, walking you through each step of the process. You’ll see just how easy it is to create a professional-looking website using Gutenberg.
So let’s get started and design a page that will showcase your skills and impress your clients. Trust me, this is going to be fun!
Step 1. Choose the color scheme, typography, and layout of your website.
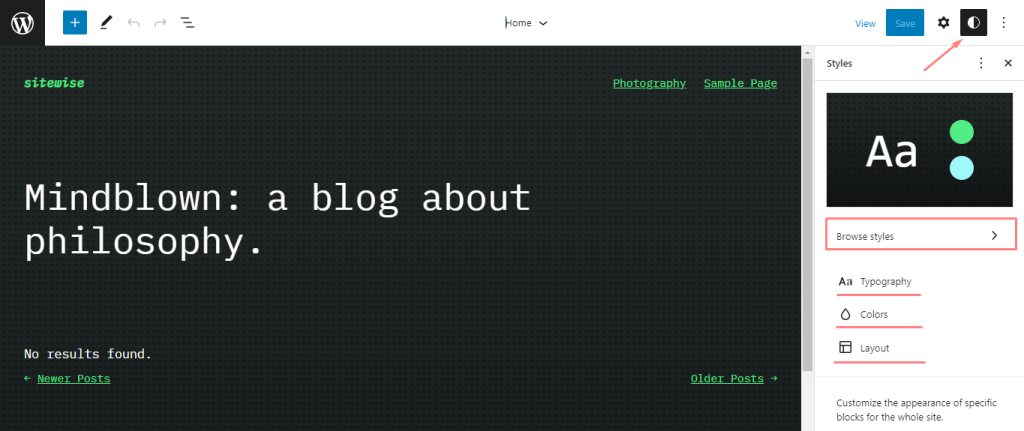
When it comes to your website, what’s really important in your website’s appearance is color and typography. These elements can really make a difference in how your website looks and feels to your audience. So, it’s crucial to choose the right color scheme and typography that aligns with your brand and target audience.
Ready to discover the ultimate photography themes?
Look no further! Check out our article now and take your photography to the next level.
To change your color and typography in WordPress, Here’s what you need to do;
- First, log in to your WordPress admin panel.
- Once you’re logged in, navigate to the “Appearance” section on the left-hand menu and choose “Editor.”
- On the top right of the editor’s interface, you’ll see a “Styles” dropdown menu. Click on it to reveal a list of different style combinations you can choose from.
- From there, you can select your preferred color scheme, and typography, and even customize the layout of your website to your liking.
It’s important to note that this option is only available in some WordPress themes, so if you don’t see the “Styles” dropdown menu, you may need to install a different theme that offers this customization feature.
By using these simple steps, you can easily change the look and feel of your website to better align with your brand and appeal to your target audience. So, go ahead and experiment with different color schemes and typography until you find the perfect combination that truly represents your unique style!
Step 2. Customize your Website Header and Footer & Add a Navigation Menu
User experience is crucial when it comes to your website, and navigation is a key component of a great user experience.
When it comes to navigation, you have a lot of options beyond just inserting a navigation menu in the header and footer. You can also use this area to showcase important information about your website, such as your contact information, logo, and more. By doing so, you not only make it easier for visitors to find what they’re looking for, but you also build trust and credibility with your audience.
let me walk you through the process of adding or customizing your website’s header and footer.
Header:
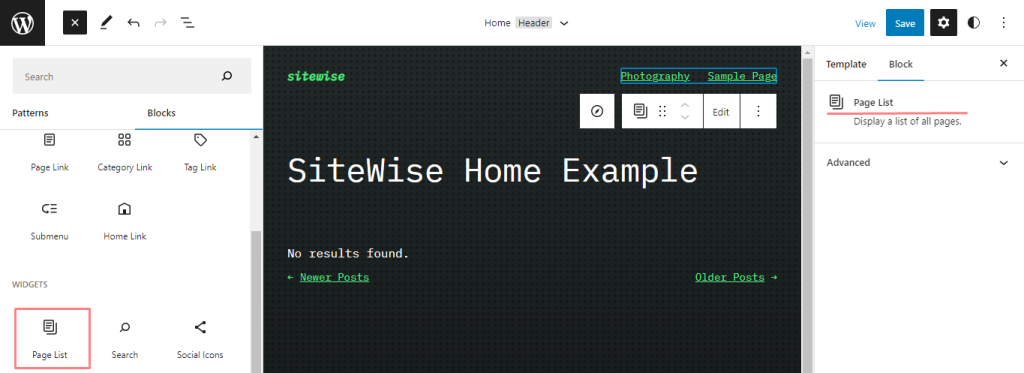
- To get started, log in to your WordPress admin dashboard and go to the page where you want to add or customize your header.
- Next, select or add the Page List block. This block is basically your menu, and it contains your website pages.
- When you add the Page List block, it will come with your page list by default. However, you can also add a custom URL to it. Just click on the navigation block and add your page URL by selecting “Add Page” and then “Custom URL.”
- If you can’t see the plus icon, just click on the navigation icon on the toolbar.
- You can also add your website logo and search bar to your header if you like. Simply select the logo or search block from the toolbar and customize it to your liking.
Footer:
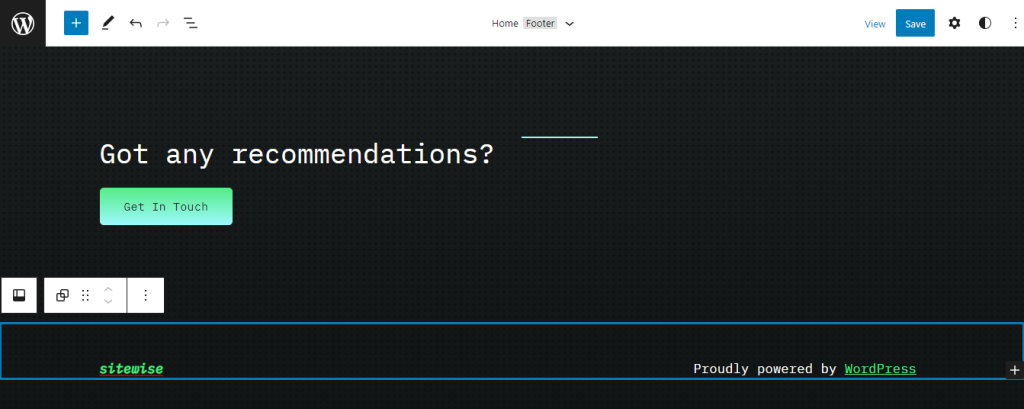
- To customize your footer, simply click on the footer block and add any element you like.
- Anything you add to the footer block will be shown on all your website pages. So, you can add social icons, a search bar, a website logo, a paragraph, and basically anything you like, and customize it just like the other blocks.
By customizing your website’s header and footer, you can enhance its overall look and feel, and make it more user-friendly for your visitors. So, don’t be afraid to get creative and make it your own!
Step 3. Create a New Page
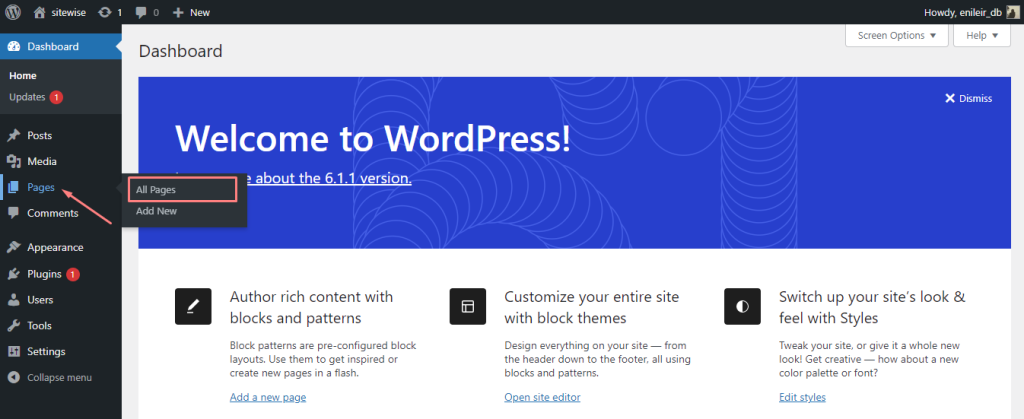
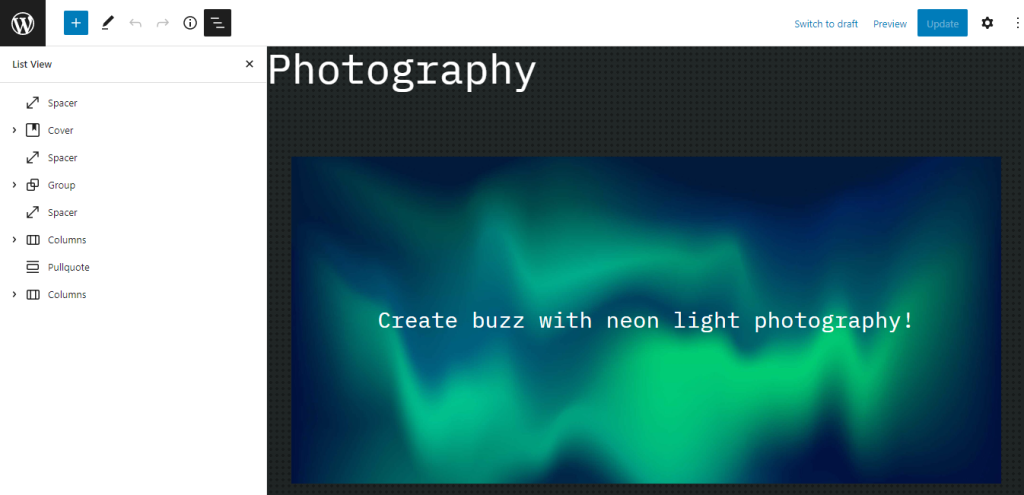
let’s dive right in and design a single page together using the Gutenberg block editor. Let’s assume that this page is all about photography, and we’ll create a design that showcases your website’s identity.
Here are the step-by-step instructions to create a stunning single page with the Gutenberg block editor:
- To get started, go to your WordPress dashboard and navigate to “Pages,” then click “Add New.”
- Add your page’s title before you begin your design because every page needs a title.
- Now, let’s add different blocks to showcase your page and customize it in a way that reflects your brand. Start by adding the cover block and add text to it. Decrease opacity for a more subtle effect.
- Next, add a spacer block with a height of 75px, followed by a group block with two columns by the column block, centered with images and paragraph blocks.
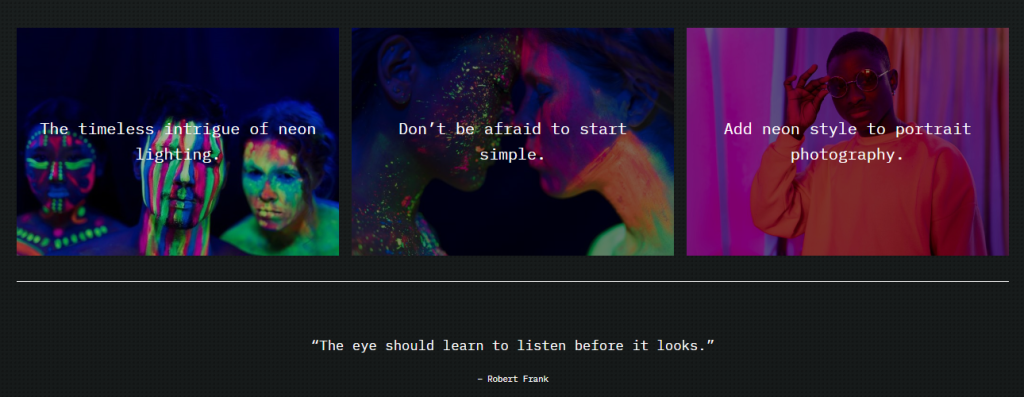
- Add another spacer block with a height of 75px, then create three columns, each containing a cover block with text.
- Add a pull-quote block to make your page more visually appealing.
- Lastly, add two columns with an image, heading, paragraph, and button block to make your page more engaging and interactive.
By following these simple steps, you can design a single page that showcases your website’s identity, attracts visitors, and keeps them engaged with your content. So, what are you waiting for? Give it a try and unleash your creativity!
Conclusion
To sum it up, the WordPress Gutenberg block editor is an absolute game-changer when it comes to website design. With its full-screen experience and a plethora of formatting options and customizable blocks, creating stunning web pages has never been easier. And with the Twenty Twenty-Three theme and block patterns, designing website on WordPress has become even more effortless, without the need for plugins or additional website builders.
By following the steps outlined in this article, you can create a website that perfectly showcases your brand identity, attracts visitors, and keeps them engaged with your content. Regardless of whether you’re a beginner or an experienced web designer, the WordPress Gutenberg block editor has got you covered. So, don’t be afraid to unleash your creativity and give it a try!
In conclusion, the WordPress Gutenberg block editor is a must-have tool for anyone looking to create a website that is not only visually appealing but also functional and user-friendly. So, take the leap, and let your creativity shine!
Welcome to our Sitewise website services!
As a team, we specialize in crafting exceptional digital experiences for businesses of all shapes and sizes. Our range of services includes website design, development, and optimization.
When it comes to designing websites, one of our key priorities is speed and optimization. We understand that in today’s fast-paced digital world, every second counts. Slow-loading websites can quickly turn off potential customers, causing them to leave your site and look elsewhere. That’s why we prioritize designing fast and optimized websites that load quickly and seamlessly.
But what exactly does it mean to have a fast and optimized website? It means that we take into account factors such as page load times, image sizes, and caching to ensure that your website loads quickly and efficiently. By optimizing your website for speed, we can help improve user experience and keep your visitors engaged for longer.
Additionally, a fast and optimized website can also have a positive impact on your search engine rankings. Search engines like Google prioritize websites that are fast and user-friendly and penalize those that are slow and difficult to navigate. By optimizing your website for speed, we can help improve your search engine rankings and drive more traffic to your site.
Overall, our fast and optimized website design services can help take your digital presence to the next level. We take pride in delivering websites that not only look great but perform exceptionally well too. So, if you’re looking for a team that can design a website that loads quickly and efficiently, look no further than our Sitewise website services.
FAQ About Designing Website on WordPress
Can I design a WordPress website from scratch for free?
One of the advantages of using WordPress Block Editor to design a WordPress Website is its free and open-source nature. As a website owner, you have access to a wide range of popular free themes, plugins, and web hosting services to choose from; This means that you can build a website without the need to spend money.
Is it hard to design a WordPress website?
WordPress Gutenberg Editor is widely recognized as a highly popular platform for building websites that offers tremendous flexibility. However, for beginners who want to Design a WordPress Website, the website platform can feel daunting and difficult to use due to its inherent complexities.
will using WordPress Gutenberg Editor Benefit SEO?
Absolutely, the WordPress Gutenberg block editor can enhance your website’s overall performance, leading to higher rankings on search engine results pages (SERPs). Gutenberg has been updated to include features such as code minification, optimization, and other enhancements to speed up page loading times.
Q: How to design a WordPress website without plugin?
To design a WordPress website without a plugin, you can use a custom theme and code your website from scratch. This requires knowledge of HTML, CSS, and PHP, and can be time-consuming. Another option is to use the built-in WordPress Gutenberg editor to design your website. This editor offers a variety of blocks, including text, images, and galleries, to create pages and posts without the need for a plugin.
What are the benefits of designing a WordPress website without a plugin?
Designing a WordPress website without a plugin can offer several benefits, including faster page load times, increased security, and more control over your website’s design and functionality. By reducing the number of plugins used on your website, you can minimize the risk of conflicts between plugins and reduce the potential for security vulnerabilities. Additionally, by designing your website from scratch, you have greater control over its appearance and can customize it to fit your exact needs.

What about conversational fields – storing and viewing data in a database. Is it a good idea to use plugins or should I just go pure PHP?
Hey there!
So, in the article, I was trying to point out that you can actually create a website using just the basic features of WordPress, without adding any plugins. But here’s the thing – as you go along and want to do more stuff, you’ll likely need to use those plugins at some point.
And guess what? If you’re thinking of doing anything special using PHP within WordPress, you’re pretty much making your very own plugin that fits your needs. This is because you can’t mess around with WordPress core itself.
Hope that clears things up a bit! Let me know if you’ve got more questions.